Showing posts with label sewing tutorials. Show all posts

Pleated Belt Shalwar w/wide leg-Part 3

Asalamu alaikum,

After finishing up all the pleats we will now attach the belt and finish up our shalwar.


Step 1

With the right sides facing sew a half inch seam in the belt pieces of your shalwar.
Step 2

Fold over the seam allowance and sew a line of stitches 1/4 of an inch away to secure the seam allowance.


Step 3
With the right sides of the legs together, sew the center back seam of your shalwar.
It should look somewhat like this.
Step 4
Take one end of the belt and place it on the top of the leg pieces, the right side should be facing each other. The belt should be half an inch to the left of the center seam(this will be the center front seam allowance of the belt).
Pin the belt in place all around the legs, the center back seam of the belt and shalwar should be roughly at the same point.
What it looks like when you have finished pinning in place. The centerfront of the belt should over lap by half an inch for the center front seam.

Step 5
Sew from the center front seam of the legs around the shalwar and back to the front. Then sew up the center front seam of the belt, stopping 1.5 inches from the top(to leave a space for the drawstring.

Here is the belt attached to the legs.

Step 6
Now sew a line along the bottom of the belt to secure the seam allowance, it should be facing upwards.
Step 7
At the center front seam of the belt, fold the seam allowances away from the center by 1/4 inch and then fold the over 1/4 inch again. Sew a line down one side across the center seam and up the other side, this will be the opening in your drawstring casing.
Step 8
Starting at the openingyou made above, fold the top of the belt over by 1/2 an inch towards the wrong(inner) side.

Step 9
Fold it over by another inch to form the drawstring casing, do this all around coming back to the opening. Pin in place, and then sew a line of stitches all around on the bottom of the casing.

Step 10
On the wrong side of your shalwar, fold the leg in half and measure out along the hem from the fold 7", and mark, this is your foot opening.
Step 11
At the center crotch seam mark up 1/2 inch.

Step 12
Keeping the shalwar folded in half mark a lin from the foot opening to the center crotch seam, one inch away from the edge of your fabric. Do the same on the other leg. Sew the seam, starting at one foot, going up the leg to the center seam, and then down the other leg.

Now your shalwar is completed, give it a good pressing and it is ready for wear.

Front view of the finished shalwar

Back view of the pleated shalwar.

End of Part 3 for any questions please leave a comment.

Pleated Belt Shalwar w/wide leg-Part 2

Asalamu alaikum,

After you have sewn your leg pieces together, we will start the hem of the legs.

You will need two pieces of heavy weight interfacing or buckram. They should be 1"x16".


Step 1

Center the buckram on the wrong side of the bottom of the leg opening, about half an inch up from the edge.
Step 2

Fold the half inch of fabric up over the buckram, you can sew one line of stitches along the edge to hold it in place if you like.

Step 3
Fold the buckram up one inch, so that is completely enclosed in the fabric, if you have not sewn a line of stitches to secure it then you may like to pin it in place now.

Step 4
Sew anywhere from 2-10 lines of stitches running perpendicular to the bottom of the leg opening. The minimum is one line at the very top edge of the buckram and one at the bottom.


A bit difficult to see but on this shalwar I sewed 6 lines.


Step 7
Place the two leg pieces with right sides together and sew only one of the crotch seams, this is the center front.

Step 8

Make a "knife pleat", pinch about one inch of fabric on one side of the center seam and fold it over towards the seam, pin it in place.
Step 9
Do the same on the opposite side of the seam.


Here is what your first two pleats should look like.


Step 10
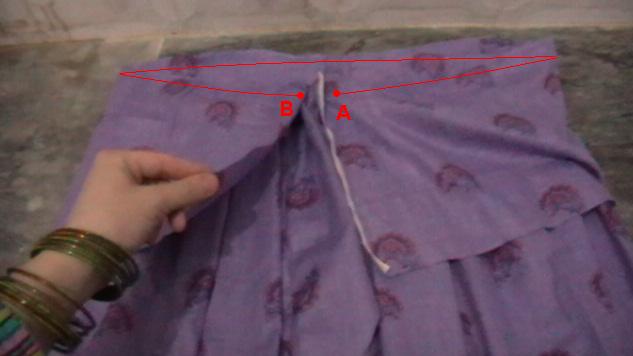
Continue making knife pleats(they should be overlapping by about 1/4 to 1/2 inch) that face the center seam until the distance between thecenter seam and the center of the rectangular center leg piece is about 5"-6", so the total width of the center pleated section should be 10"-12".

This diagram basically shows what you are trying to do, the center of the leg pieces should fall from your hip bones in a line down the front of your legs, so the area between points A and C should be roughly the distance across your hips, somewhere in the neighborhood of 10"-12"(can be more if you need it but not less).


Step 11
Sew a line of stitches to secure all the pleats in place, it should be between 1/4 to 1/2 inch down from the top edge.

On this shalwar I have made nine pleats on either side of the center seam, total of 18 pleats across the front.

Step 12
Now to make the pleats on the back side of the shalwar-lay it out flat, and make knife pleats that face away from the center back seam.


Step 13-
Pinch one inch of fabric, and then lay it flat, facing away from the center back seam, pin in place.

Step 14-
Make several pleats, until the distance from the center front seam to the center back is half the width of your belt. Do the same on the other side of the shalwar. On my shalwar I made 3 pleats on either side of the back seam for a total of 6 pleats.
Step 15
Sew a line of stitches to secure the pleats, in the same way as you did for the front pleats in Step 11.


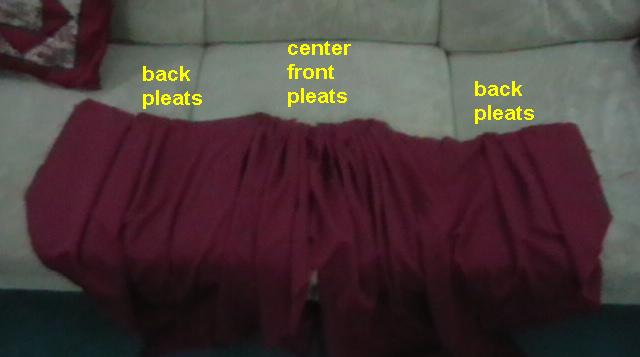
Here is what you should have so far, the two leg pieces sewn together with a large section of pleats in the center and two smaller sections at either side(this will be sewn to make the center back seam).


End of part two, if you have any questions please leave a comment and let me know.

Pleated Belt Shalwarw/wide leg-Part 1

Asalamu alaikum,

Your first step is to find your measurements. This is the same as the measurements for the simple shalwar. For this shalwar it is best to use fabric that is 45 inches wide, you will need a piece that is at least 2.5 yards. If you are unsure of having enough, get a bit extra. It is possible to make this style of wide leg shalwar with a narrower fabric, but you have to be very careful in the cutting.

Step 1-Measuring

To start you will need to figure out some measurements, if you have a shalwar that fits you then you can measure that. If you do not have a shalwar, then you need to do a bit of math. Measure from where you want your waist band to fall to just below your ankle. Take that number and subtract 7 for the belt, the remainder is your desired leg length. To the belt you need to add 2 inches of height, 1.5 for the drawstring casing and .5 for the seam attaching it to the legs, so the total height of the cutting for the belt is 9 inches. You also need to add 2 inches to your desired leg length, .5 for the seam and 1.5 inches for the hem at the foot. So for example if your measurement for the total height of your shalwar was 38, that would be a belt of 7 inches(9 cutting) and a leg of 31(33 cutting). For the width of the belt you measure your hips at their widest and then add at least 6 inches for ease (although you can add more if you like), plus 1 inch for seams.


Step 2
Fold your cloth in half the long way, place the cut side to your left and the fold side to your right. You are first going to cut the main leg piece. Along the selvage closest to you measure from the left corner down the total length of your leg (for the 38" shalwar, that would be 33"). the width of the rectangle should be 14", if you prefer a wider foot opening you can make it slightly wider.

Step 3
The width of the next piece should be at least 20", measure up from the main leg piece along the cut side. From there measure down 9", this is the crotch seam measurement.

Step 4
Make one diagonal line connecting the crotch seam to the bottom of the main leg piece.

Step 5
From the bottom of the leg piece measure out 9".


Step 6
Measure the same width as for Step 3 (in my example it is 20").

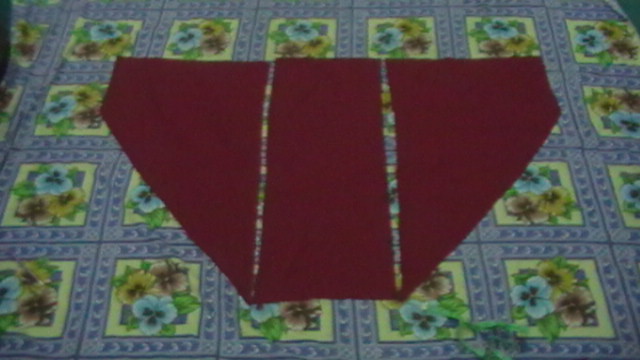
This is what your pieces should look like-


Step 7
Cut along all the lines, and separate you pieces, you should have two main leg pieces, and four outer leg pieces(two left facing and two right facing).

Step 8
From the extra pieces, cut two rectangles for the belt. They should be 9" tall by half the width you calculated in Step 1.
Step 9
Arrange your leg pieces as above, and sew together with right sides facing.


End of part one, if you have any questions please leave a comment and let me know.

Finished shalwar tutorial, and what comes next?

Asalamu alaikum,

I have finally finished the second belt shalwar tutorial! This shalwar has a wider leg and a slightly looser feel, which I personally prefer.

It was pretty easy to get the cutting/sewing and all the pics, the difficult part was the uploading and trying to explain what I'd done! But finally I have finished, and have scheduled the posts for Sunday, Monday, and Tuesday of the coming week. It was a very pic heavy post so I split it into three parts. Please do excuse my horrible dark pictures, Tariq has just fixed the tube light in my sewing room so I hope in future it will not be so dark. :-)

Also I am considering what to do next, tutorial wise, and I had an interesting idea. I am planning a tutorial of necklines, but I was thinking what if instead of one big tutorial, I broke it up into smaller pieces? It would be similar to my "Friday Feature", every week(or maybe every other week), I could post a different style or design. I think it might be better this way, give me a weekly deadline.

So- comments? questions? suggestions? requests? Let me know what you think, if you have any thing in particular that you would like to see a tutorial on.

Gathered Belt Shalwar w/Simple Leg-Part 2

Asalam Alaikum,

At the end of part one the main legs of our shalwar were finished, now we will be sewing the belt piece and attaching it to the legs, and finishing up our shalwar.

Step 1

Take the two pieces of you belt and sew a half inch seam, this is the center back seam. If you were able to cut one long piece for the belt then you can just skip this step.

Step 2
Make sure your leg pieces are right side out, with the right sides facing place one end of the belt half an inch to the left of the center seam and pin. The half inch is for the center front seam so you will start sewing on the center line of the legs not the exact edge of the belt.

See the extra half inch? Pin the belt in place starting half an inch in from the edge.
Step 3
Working your way around pin the belt in place every couple of inches.

Step 4
When you get close to the center back seam of the belt you will see that it does not match to the center seam of the legs. You will now need to make one or more knife pleats on either side of the center seam to make the center of the belt match the center of the legs. Here is a tutorial on making knife pleats, they actually measure but usually I just kind of eyeball it.
With the belt facing down, I pinch the excess fabric of the leg and form my pleats.
After pinching lay the excess flat and pin in place.
On the inside the pleats will face towards the seam, on the outside the pleats should face outwards, away from the seam. Remember to make the same number and same size of pleats on either side of the seam. Continue pinning the belt in place all the way around until you get to the center front seam again. You should have about a half inch extra on this side also.
Step 5
Starting at point A, sew around the top, sewing the belt to the legs until you get almost back to were you started at point B.
Step 6
Now you will sew up the center front seam of the belt piece. Matching up points A and B, and making sure the leg pieces do not get caught in the seam, sew from just above points A and B to point C, stop and turn around sew back for one inch to secure the seam. the distance from point C to the top of the belt should be 1.5 inches. This will be the opening for the drawstring.

Step 7
On the wrong side fold the edges of the center front seam away from the seam, and sew a line of stitches down one side across the bottom and up the other side.


Step 8
Starting from the center front seam, one quarter inch up from the seam that attaches the belt to the legs, sew a line of stitching to keep the extra cloth in the seam facing upwards. You should catch the seam that you made when attaching the belt to the legs.


Step 9
Now you will sew the drawstring casing. Starting at the center front where you made the opening, on the wrong side of the cloth, fold the top down half an inch, and then fold it down one inch, and sew along the very bottom edge to form the casing.

Step 10
Line up the inside seams, at the bottom of each foot opening mark out from the fold 7 inches.

Step 11
On the center crotch seam mark up from the bottom half an inch.
Step 12
Draw a connecting line from the mark on one foot(point A) up to the center mark(point B), and then back down to the other leg(point C).

Step 13
Starting one inch away from point A sew down to the bottom of the leg and then turn and sew up to point B(center crotch seam), and then down to point C. When you get to the bottom of the second leg, turn and sew back up one inch, sewing back over the stitches at each of the foot openings reinforces them.
Your gathered belt shalwar with a simple leg is now finished, and showed look something like this-
If you see a mistake in this tutorial or need more explanations feel free to leave a comment and inshAllah, I'll get back to you as soon as possible.