Showing posts with label *Desserts. Show all posts

Dairy-Free Blueberry-Coconut Popsicles or "Ice Cream"

This is a simple recipe for a very flavorful and refreshing popsicle. Since I can't have dairy, due to IBS, I've found coconut milk to be a great stand in for creamy desserts. I love the combination of blueberry and coconut so this popsicle recipe has become my favorite. The flavor is intense and a great balance of tart and sweet. The coconut milk rises to the top of the mold while it freezes which makes two layers.

Blueberry-Coconut Popsicles (or "Ice Cream)

1 can full fat coconut milk
2 cups blueberry juice (I strained pureed thawed berries that I had in the freezer)
1/4 cup maple syrup

Mix together ingredients and pour into popsicle molds. Enjoy!


Look at this cute little ice cream maker. It's slightly bigger then a coffee mug. My Aunt Linda gave it to me and this was the first time I got to use it. It's a Donvier Half-Pint. I'm not sure that they're still in production. I wasn't sure how often I'd use it at first but now that I've given it a try, I love it! One problem with non-dairy ice creams is that they get really hard in the freezer. If I only make one serving at a time, I can enjoy it while it's still scoopable.

It took me about 3 minutes of turning the little crank on top to get ice cream. It's delicious. The tart, sweet flavor is intense and the coconut milk makes it just creamy enough. I'm going to be using this little ice cream maker more often from now on.


This recipe has been shared as part of Simple Lives Thursday.

The Ultimate Chocolate Cupcakes (Dairy-free)

For Valentine's Day this year, I made these cupcakes. Moist chocolate cake topped with chocolate fudge icing. I'm pretty sure they're the best cupcakes I've ever had. The cake is moist and has a delicate texture. The icing is rich but with a hint of tang from the vinegar that gives it that perfect balance. I'm very sad that there's only one cupcake left and it's Jon's. Jon won't be home for hours and hours though.....hmm....

This cake/frosting recipe can also be baked as a sheet cake. I thought cupcakes would be a nice change of pace.
I adapted the original recipe (found here at King Arthur) to be dairy-free and I added an ingredient or two to add more flavor. If you are able to enjoy dairy, feel free to use the original recipe or use butter and milk in place of the Earth Balance and coconut milk. I can't promise the same result but it would probably work just fine.


Dairy-Free Chocolate Cake

1/2 cup Earth Balance (or other non-dairy butter substitute)
1/2 cup oil (I use extra-light olive oil)
1/2 cup cocoa powder
1 1/2 cup coconut milk (heated in the microwave until hot to the touch)
1 tsp. white vinegar
1 tsp. instant coffee granules
2 cups sugar
2 large eggs, beaten
1 tsp. vanilla
2 1/4 cups whole grain spelt flour (or use 2 cups of all purpose or whole wheat pastry flour)
1 tsp. baking soda
1/2 tsp. salt


Preheat oven to 350*. Grease and flour a 9x13 cake pan or line 24 muffin cups with cupcake liners.

Melt the butter substitute in a medium or large microwaveable bowl. Stir in oil, cocoa, hot coconut milk, vinegar, and instant coffee powder. Using a whisk, mix in eggs, vanilla, and sugar until very well combined.

In a separate bowl, stir together flour, salt, and baking soda until well combined.

Stir dry ingredients into wet ingredients until well combined. Pour into 9x13 pan or divide evenly between 24 muffin cups (filled about 3/4th of the way full).

Bake cupcakes for 20 minutes or 9x13 pan for 30 minutes or until a toothpick comes out clean.

Let 9x13 cake cool in the pan. Cupcakes can cool in their liners on a cooling rack.


Dairy-Free Fudge Frosting

1/2 cup Earth Balance (non-dairy butter substitute)
1/4 cup cocoa powder
6 Tbsp. coconut milk
1 tsp. vinegar
1 tsp. vanilla
1/8 tsp. salt
4 cups (1 lb.) confectioner's sugar

In a medium sauce pan, melt the Earth balance. Stir in cocoa powder, coconut milk, vinegar, vanilla, and salt until smooth. Bring mixture to the boil, then remove from the heat and mix in the confectioner's sugar, beating until smooth. Pour over cake while the frosting is still warm or frost cupcakes while frosting is still warm.
Yield: enough for one 9x13 cake or 24 cupcakes.

*The frosting will firm up pretty quickly as it cools though it never gets hard.
*If you frost cupcakes, you might notice the frosting starting to firm up in the pan. If you put the pan over a slightly warm burner for just a second and stir, the frosting will loosen up enough for you to continue frosting cupcakes.
*If you add sprinkles to your cupcakes, add them IMMEDIATELY after frosting each cupcake since the top layer of frosting cools quickly and prevents sprinkles from sticking.


This cupcake got dunked in the pink sugar sprinkles.

I topped them a few different ways. I found I preferred the plain ones since the sprinkles were too crunchy.


Evan didn't care how his cupcake was decorated. He ate the frosting first.
I've linked this post up with Simple Lives Thursday.

Peach Gingerbread Upside Down Cake

I was looking through the chest freezer the other day and saw a few bags of peaches from last summer. This peach gingerbread proved to be a delicious way to use some of last year's local peaches. The peaches are baked in the bottom of the pan but you flip the cake over before serving. The spicy gingerbread was the perfect complement to the sweet peaches...a match made in heaven!

Peach Gingerbread Upside Down Cake (adapted from this recipe from King Arthur.com)

Topping
1/4 cup butter, melted
1/3 cup brown sugar
1 Tbsp. water
4 cups peeled, pitted, sliced fresh peaches or frozen peaches that have been thawed and drained

Cake
6 Tbsp. butter, softened
2/3 cup brown sugar
1 tsp. baking soda
1 tsp. ginger
1 tsp. cinnamon
1/2 tsp. salt
2 eggs
1/3 cup molasses
1 1/2 cups whole wheat pastry flour (or all-purpose)
1/2 cup buttermilk (or almond milk with 1 tsp. vinegar)

Preheat the oven to 350*. Lightly grease a 9" square cake pan.

To make the topping, stir together melted butter, water, and sugar. Mix together with the peaches and layer the peaches in the bottom of the prepared pan. Try to arrange them in an even layer.

To make the cake: Beat butter, sugar, baking soda, ginger, cinnamon, and salt together until smooth. Add the eggs one at a time, beating until smooth. Beat in molasses. Gently mix in the flour, then the buttermilk. Spoon the thick batter over the peaches gently in an even layer. Bake the cake for 35-40 minutes or until a cake tester inserted into the center comes out clean.

Remove it from the oven, wait 1 minute, then invert it onto a serving platter. As an alternative, you can keep the cake in the pan and flip over each piece of cake as you're ready to serve it.

Yield: ~16 servings

Whole Wheat "Pain Au Chocolat" (Chocolate Rolls)

These slightly sweet chocolate rolls are eaten in France as a breakfast treat or an after school snack. Typically the dough is a puff-pastry style dough but I recently found a recipe for a softer, dinner roll type dough and thought I'd give it my own spin. The result is a pillowy soft roll with melted chocolate inside that has become quite a hit in this house. The chocolate provides just enough sweetness to make it feel like a treat but the dough is actually 100% whole wheat so it's a treat you can feel good about.


Whole Wheat Chocolate Rolls (adapted from this King Arthur Recipe)


1 1/4 cups lukewarm water
3 Tbsp. sugar
4 Tbsp. butter, softened (or Earth Balance)
2 tsp. vanilla
2 1/4 cups white whole wheat flour or regular whole wheat flour
1/3 cup dried potato flakes
2 Tbsp. ground flax meal (opt.)
1 Tbsp. vital wheat gluten
1 1/4 tsp. salt
2 tsp. or one envelope of yeast

~1 cup of semi-sweet chocolate chips


In the bowl of a stand mixer, mix together all ingredients except the chocolate chips. The dough should come together resembling the texture of play-doh. Use the dough hooks to knead the dough for about 4-5 minutes. This dough stays sticky so it's hard to knead by hand. If you don't have a stand mixer with dough hooks, lightly oil your counter top and hands before you try to knead it. You don't want to add more flour to keep it from sticking.

Cover the dough and let it rise for about 90 minutes or until almost doubled.


Divide dough in half. Roll half of the dough into a rectangle 9"x8". Cut the dough into 6 even rectangles.


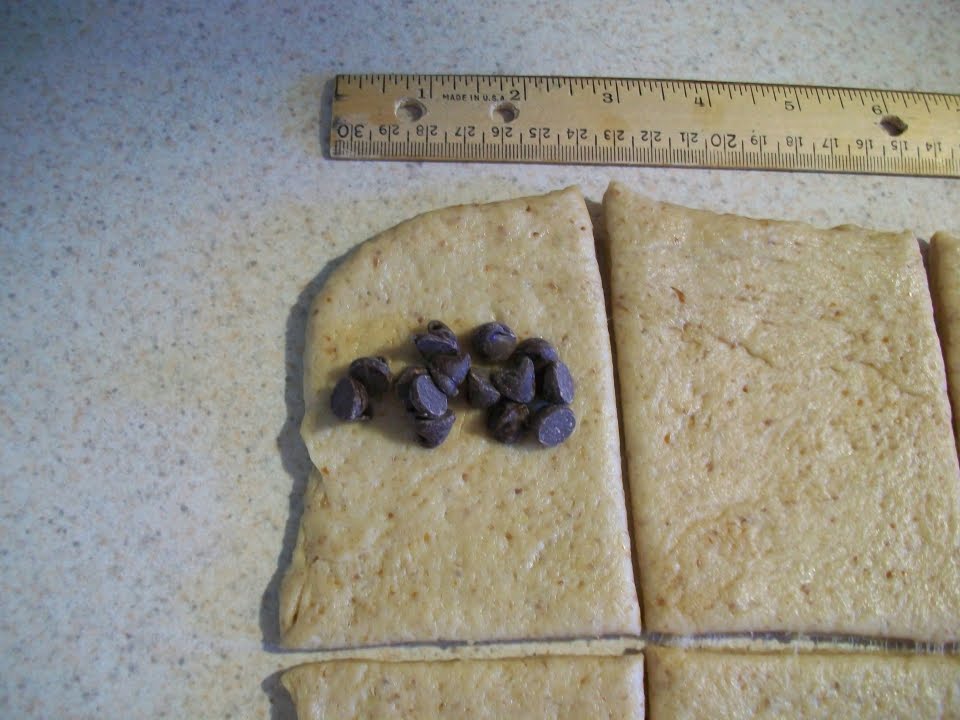
Place some chocolate chips about 1/3 of the way down on the small rectangle. The amount of chocolate is up to you but you'll need to be able to close the dough.


Fold the top of the dough to cover the chips....


and press the seam closed.


Lay more chocolate chips in the seam....


and fold the bottom of the dough up, sealing in the chocolate chips.

It's okay if the chips show from the ends. They won't melt out during baking.

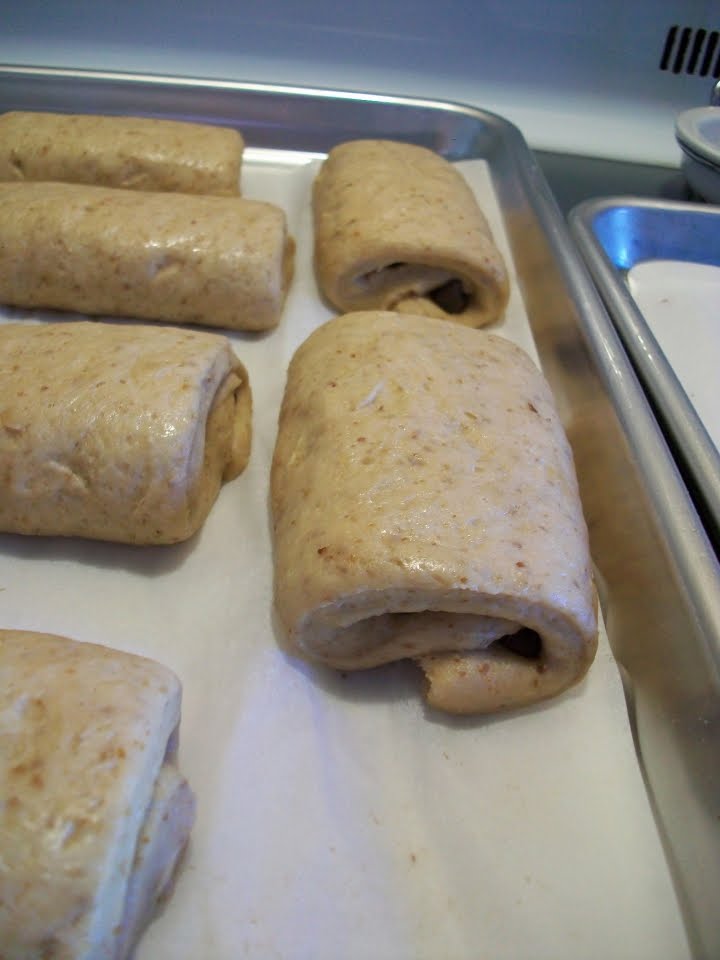
Repeat with the rest of the small rectangles and with the other half of the dough. Lay the rolls seam side down on a parchment lined baking sheet. Cover lightly with a piece of greased plastic wrap. Let them rise for about an hour.

They'll look slightly puffy but shouldn't be huge.
Preheat oven to 350*


Bake at 350* for about 20 minutes. You want the edges to be just barely golden brown. Move them to a cooling rack to cool completely if you don't plan on eating them right away.

Dust with powdered sugar if you like. These are best eaten slightly warm. They reheat nicely in the microwave for about 10 seconds.
Melted chocolate inside a soft, flavorful roll... doesn't get much better then that!

Prepared For Some Serious Baking

My mom got an email from King Arthur Flour's website just before Christmas with a sale on quart sized bottles of vanilla. It was a great sale so we each bought a quart. It's wonderful quality and smells amazing. It works out to about half of what I pay for real vanilla from the store.

Now I'm ready for some serious baking!

Baking Day + Buckeye & Pumpkin Cheesecake Recipes

The day before Thanksgiving, my brother, sister and her gang arrived just before 2 am. Needless to say, napping was a must. Katie and Buford snuggled on the big couch. This was the first time we got to meet Buford. He is the sweetest puppy. Such a good boy too... at least while he's traveling, right, Kate?


Since I volunteered to be in charge of desserts for Thanksgiving, Wednesday was spent baking, baking, and baking. Have I mentioned that I love baking? I just wish my kitchen was a bit bigger and I had maid that would clean up after me while I bake.


Katie helped me so much! Here she is putting the chocolate coating on some buckeyes (recipe further down).

I'm showing you this picture for two reasons. The first reason is that I think it's funny even though it's blurry. I was pretending to eat a buckeye... or did I really eat it, Katie? I can't remember. The second reason is that you can see just how messy my kitchen was while we were baking. Do you see the sink full of dishes? There are clean dishes lined up on the half wall. There are dishes and ingredients stacked up on the counter behind me. This is how I work, folks.


We had leftover melted chocolate after we dipped our buckeyes so we coated some pretzel rods and Katie was in charge of putting sprinkles on them. She took her job very seriously and did a beautiful job. We ate these after dinner since we couldn't eat the Thanksgiving desserts.

Aren't they beautiful? I love pretzels dipped in chocolate. This post is making me hungry. One of the hazards of blogging, I suppose.
Devin and Jon worked on a puzzle for a bit.

If you try one new recipe this Christmas season, let it be these buckeyes. They're like Reece's cups but better in my opinion. They have a slight crispness because of the graham cracker crumbs. They're just the right balance of sweetness and slight saltiness of the peanut butter. I have to say that I ate quite a few of these little guys. They were really easy to make, too.
Buckeyes
1 1/2 cups creamy peanut butter
1 cup graham cracker crumbs
1/2 tsp. salt
1 tsp. vanilla
3 cups powdered sugar
10 Tbsp. butter (or Earth Balance), melted and cooled
12 oz. semi-sweet chocolate chips
-With a mixer, mix together peanut butter, graham cracker crumbs, vanilla, salt, and powdered sugar until well combined.
- Roll peanut butter mixture into balls in the palm of your hands. Make them as big or as small as you like. I made them about a Tbsp's worth of filling per ball. Set them aside on a baking sheet while you melt the chocolate.
- Melt the chocolate chips in a microwave safe bowl for 30 seconds at a time, stirring often until 75% of the chips are melted. The residual heat will melt the rest. You do NOT want to over heat the chocolate.
- Line a sheet pan with waxed paper or parchment paper. Take one peanut butter ball at a time and dip the bottoms in the chocolate. Place the coated peanut butter ball on the paper line baking sheet to set up. Repeat until all candies are coated with chocolate.
*I've tried a few ways to dip them into the chocolate and none worked better then just using my fingers. The sides get a little smudged but they still taste great.*
-Set the buckeyes aside in a cool place until the chocolate sets. Store at cool room temperature.


Chris helped Katie and I mix up these pumpkin pies. I never get tired of pumpkin pie.
I couldn't resist making another apple slab. This picture was taken before I put the icing on. I waited until the next day to add the icing since I didn't want it to get soggy. Apple Slab


It's rare that I don't alter a recipe. This Almost Famous Pumpkin Cheesecake recipe needs no alteration. I made it last year for Christmas and it was fantastic! This year I can't eat it due to the dairy but I still made it knowing everyone else would enjoy it... especially Mark!
It really is worth the time to make this cheesecake. It knocks pumpkin pie right out of the water!


So, those were the desserts of Thanksgiving. I hope everyone enjoyed eating them as much as I enjoyed making them (with Katie's help). I really wish I had some dessert right about now....


Dairy-Free Pumpkin Pie

I have baked 3 pumpkin pies in the past 2 weeks in preparation for the big day. With Thanksgiving only 2 days away, I'd like to share my pumpkin pie recipe that I think is better then the traditional pumpkin pie and it happens to be dairy-free.

I am in charge of bringing desserts to our Thanksgiving at Mom and Mark's this year. I had so much fun deciding what desserts to bring. Here's the final dessert menu:
Apple Slab
Pumpkin Cheesecake (I'll share that recipe soon)
Pumpkin Pie
Buckeyes


I wanted to be sure that any adjustments that I made to the recipes would be delicious so I decided to have some pie trial-runs. The pumpkin pie on the left is made with almond milk and the one on the right is made with coconut milk.
The reverse is true in this picture. The pie made with coconut milk is on the left and the one made with almond milk is on the right.
.
Both pies were good. The one with almond milk was clean and refreshing tasting. It's texture was softer. The one made with coconut milk was creamier, smoother, and held up beautifully. The coconut milk pie was the clear winner. I don't think anyone would have been able to tell it wasn't made with dairy cream.
.
Last week I made pumpkin pie one more time just to be sure. Yeah, that's why I made it again. It sure wasn't because I just had a hankerin' for pumpkin pie.
.
.
Dairy-Free Pumpkin Pie
.
1 unbaked pie shell (I use this recipe but only use half the recipe per pie) in a lightly greased pie plate
3/4 cup sugar
1 1/2 tsp. cinnamon
1/2 tsp. salt
1 tsp. ginger
1/4 tsp. nutmeg
2 large eggs, beaten
15 oz. can of pumpkin puree or almost 2 cups of homemade, well drained)
1 1/2 cups coconut milk (can be found at most supermarkets near the Asian foods)
1 tsp. vanilla
.
Preheat oven to 425*.
Mix all ingredients (except the pie shell) until they're well combined.
Pour into the pie shell.
Bake at 425* for 15 minutes. Lower the oven temperature to 350* for 50 minutes or until the center of the pie isn't very jiggly when you give the pie pan a little nudge.
Happy Thanksgiving!

Apple Slab - Silly Name, Delicious Pie

Jon has decided that this is his new favorite dessert and all other apple desserts are a waste of time. I think I agree. This is a big apple pie with a slightly tart filling and a delicious, apple cinnamon icing on top. The great thing is that it's a BIG apple pie so it will serve a crowd. This pie is best within the first day or two after it's baked because the crust tends to get soggy after the second day so be sure to eat it fast... not that that was an issue in this house.

Before the icing


Apple Slab (dairy-free alternatives in blue)


Crust

2 1/2 cups whole wheat pastry flour (you could use all-purpose)
1 tsp. salt
1 tsp. baking powder
2 Tbsp. confectioners' sugar
1/4 cup cold lard (or butter)
10 Tbsp. cold butter (Earth Balance)
1 tsp. vinegar
6-7 Tbsp. ice cold water

Filling

10 cups peeled, cored, and sliced Granny Smith or other firm, tart apples (the icing will make the pie way too sweet if you use sweet apples)
2/3 cup sugar
2 tsp. cinnamon
1/2 tsp. nutmeg
1/3 cup flour
1 1/2 tsp. vanilla


Icing

2 cups confectioners' sugar
1/3 cup frozen apple juice concentrate, thawed
1/2 tsp. cinnamon


Directions:

-Make crust: In a food processor, blend flour, salt, baking powder, sugar until well mixed. Add lard and butter (Earth Balance) and pulse until the mixture is crumbly. The lard and butter chunks should be the size of a small pea. Add the ice water and vinegar and pulse just until the dough starts to come together into a ball. Dump the dough onto a lightly floured surface and divide the dough into 2 pieces... one slightly larger then the other. One ball being about 60% of the dough and the other 40% of the dough. Pat the dough into flat rectangles, wrap in plastic wrap, and put in the fridge for at least 30 minutes.

- Preheat oven to 350*

- With the larger rectangle of cold dough, on a lightly floured surface, or between two pieces of plastic wrap, roll out the dough until it's about 11x15". Don't worry if the dough is rough around the edges. This pie is very forgiving.

-Place the dough into a 9x13", ungreased baking pan. Let the dough come up the sides of the pan, pressing them gently into place. It's fine if the sides aren't completely covered but patch any holes in the bottom because you don't want the filling leaking out.

-Mix together all filling ingredients in a large bowl until the apples are all coated in the other ingredients. Dump the filling gently into the pan lined with dough being careful to distribute the apples evenly.

- Roll the remaining cold dough into a rectangle large enough to cover the top of the pie. Lay the crust on top of the apples. It's fine if the dough doesn't reach the sides of the pan but try to get it close. Cut 6 or 8 slits in the top of the crust to let steam escape while cooking.

- Place slab in the 350* oven and bake for one hour. Remove from oven. It should be golden brown and bubbling around the edge. Allow to cool completely before adding the icing.

- Stir together all icing ingredients and drizzle over completely cool apple slab. Serve!

Yields 12-16 pieces depending on how you slice it.


Dairy-Free Peanut Butter Chunk Ice Cream


I've been on the look-out for Dairy-free ice creams that taste like the real thing for a while now. Ice cream is one of the only things, other then mac&cheese, that I really miss about going dairy-free ). This recipe makes an "ice cream" that would fool anyone into thinking it was made with dairy. It's rich and creamy and has delicious peanut butter chunks in it that reminded me of a Ben&Jerry's type ice cream.

Dairy-Free Peanut Butter Chunk Ice Cream (adapted very slightly from Alisa Cooks blog)


*recipe makes about 2 cups of ice cream. Double the recipe to fill most standard ice cream makers*


-1 14oz. can of Coconut Milk
- 1/3 cup creamy peanut butter
- 1/3 cup maple syrup, brown sugar, or honey (I used maple syrup and couldn't taste any maple flavor in the finished ice cream
-1 tsp. vanilla
-1 batch of dairy-free peanut butter chunks (recipe below)


Combine the coconut milk, peanut butter, sweetener, and vanilla in a bowl and stir well with a whisk until well combined. Place mixture in the fridge and allow to cool completely.

Pour mixture into your ice cream maker and follow the manufacturer's instructions.

Make peanut butter chunk recipe while mixture is in the ice cream maker.

When ice cream is done, transfer it to your storage container and top it with the peanut butter chunk mixture. Try to spread out the mixture as evenly as possible over the ice cream. Put ice cream into the freezer for about 30 minutes or until the chunks have set up. Stir ice cream, breaking up the chunks, and return the ice cream to the freezer until ice cream is firm.


*This ice cream is better when not solid as a rock. Allow it to thaw just slightly before eating for creamiest ice cream*


Ice Cream-Friendly, Dairy-Free Peanut Butter Chunks

-2 1/2 tsp. coconut oil
-1 1/2 tbsp. creamy peanut butter
-1 Tbsp. honey (don't use sugar, you want the chunks to be soft)
-1/4 tsp. vanilla


Combine ingredients in a microwave safe bowl and microwave for 10-15 seconds. Stir until coconut oil is melted and everything is well combined.


Easy Juice Gelatine

It's really easy to make your own "Jello" using gelatine and juice. Two ingredients... couldn't be easier!

Here's what you'll need:
Gelatine - You can usually find it on the top shelf near the Jello. Get the unflavored variety.

Then you'll need a strongly flavored juice. I chose berry this time but any flavor will do. I've tried apple juice before and it's kind of "blah" since apple juice is mildly flavored.

Take 1-4 packets of gelatine and sprinkle it over one cup of cold juice. Let it sit for a few minutes.
Why 1-4 packets? Well, 1 packet will yield a soft set jello. Still giggly but you have to use a spoon. 4 packets will give you firm, cutable, hold in your hand "jigglers".
Heat 3 cups of juice until almost boiling. It's not a big deal if it actually boils.


Stir the hot juice into the cold juice/gelatine mixture and stir for 5 minutes.


Either leave it in the bowl or pour it into a 9x13 pan. Refrigerate until set (3 hours). Enjoy!
My kids love it. It's so much better for them then packaged jello that is just gelatine, sugar, and flavorings. I think we'll try a firm set next time and try cutting out shapes with cookie cutters!

Homemade Chocolate Syrup

Have you ever read the ingredients on a bottle of chocolate syrup. I was not too surprised to learn that one of the first ingredients is High Fructose Corn Syrup. Months ago I stopped buying anything with HFCS after learning about how bad it is for your health. Here's is an excellent article about HFCS and how even when rats consumed the same amount of total calories, the rats that ate HFCS gained significantly more weight and body fat then the other rats that ate table sugar. Those animals that ate HFCS over an extended amount of time also had abnormally high body fat, especially in their abdomen and high triglycerides. It makes me so angry when I see commercials by the Corn Industry trying to convince us that it's like any other sweetener. For these reasons, I try to avoid it at all costs.
.
So, avoiding HFCS is one of the reasons I choose to make my own chocolate syrup. The other reasons are that it tastes SO much better then store bought and it's super easy to make. Here are the ingredients you'll need. Be sure to check your corn syrup brand to make sure it doesn't include HFCS. I found that the store brand included HFCS but Karo didn't. You need a bit of corn syrup to prevent the sugars from recrystallizing once the chocolate syrup cools.


Chocolate Syrup (original recipe found here)

1 cup cocoa powder
1 1/2 cups granulated sugar
1 cup hot water
1/8 tsp. salt
2 Tbsp. light corn syrup
1 tsp. vanilla extract

In a small sauce pan, bring the cocoa, sugar, water, salt, and corn syrup to a boil over medium heat, stirring constantly. Cook for 3 minutes.

Remove from heat and add vanilla, stirring to mix well. Let cool and then transfer to an air tight container. Keep in the refrigerator.

Makes about 1 3/4 cups of syrup.


I find that transferring the cooling syrup to a measuring cup with a spout helps to get it into my squeeze bottle that I use as a storage container without spilling. You can also wash out an existing syrup bottle and use it to store your homemade chocolate syrup.


Nothing goes better with chocolate syrup then homemade ice cream. Here's my favorite recipe for French Vanilla but I've now started using 2 cups of cream and 2 cups of milk. It makes it super creamy.
Give this recipe a try and I'll promise that you'll never reach for that bottle from the store again.