Showing posts with label gift giving. Show all posts

A Pretty Purse for a Pretty Sister

 This past weekend we were able to make a quick trip down to visit my older sister and her family. Anna's birthday was this month and I thought it would be fun to make her a purse as a present.
 I started looking through my fabric stash and I saw this wool orange and green plaid (In it's former life it was a skirt).  Anna likes bright colors and fall colors and I thought that might fit with her tastes. I decided to tone the bright colors down a bit by adding some cream in as well.

 I made up a pattern. I wanted there to be a convenient cell phone location as I don't like having to dig for mine in my purse, I like to have an inside zippered pocket and I decided to add a pocket on the front as well.
I lined the purse (which made it pretty easy to make the inside pocket) and I made it zip closed on the top. After that was done it looked like the picture above.

I thought it needed a little more so....
I made some flowers from some lining material where I melted the edges. Then I made a ball of the wool for the center of the flower. Then I decided to use some glass beads we had and I sewed them on to look like leaves and a curly stem. That was actually a fun project that I finished up as we traveled. (I know, I tend to be pretty last minute- I am trying to get better but it is hard!)

 Anna said she liked the purse. I hope it works well for her! Now I want to make myself a new one!

A nest necklace

 Are you enjoying Spring? I have been, even though I woke up this morning to fresh snow and then after melting some in the afternoon it started snowing again. I am enjoying that too but I am still excited about the real coming of Spring with birds singing, nest building and flowers blooming!

  I love this season, mud and finicky weather and all!

A while back I saw the idea for a nest necklace in a couple of different places online. I thought it was quite sweet and didn't think it looked to hard to make and I had everything I needed to make it.

I decided to make one for my sister Martha's birthday.
 I used decorative wire and coiled it up and twisted it around to make it look like a nest, then I took 3 pearl beads for eggs (my sister has 3 children, so one to represent each of them) and threaded a wire through them to secure them in place. Then I threaded a ribbon through the top. It was fun and easy to make. I think I might make one for me too.

Have you been making any projects lately? Has Spring really come to your area? What do you like about Spring?


Ultimate Blog Party {It's a lunch date at my place}

Ultimate Blog Party 2011
Hello. I am so glad you stopped by to visit! Whether you come often or this is your first time (thanks to the Ultimate Blog Party), I am glad to have you here. Please come in, I can't wait to visit and get to know you better! (Side note- this is what I love about blogging. Not only can I stay in contact with family and friends across the world- I can meet new friends too!)

In case we have never met before I guess I had better do some introductions... My name is Abbi and I am happily married to my husband of 12+ years, Ken. I am very blessed to be the stay at home and homeschooling mom of 4 beautiful children, Mara, Jonathan, Aaron and Megan. If you have kids I hope that you brought them with you as my kids would love to play with them!

Mara-11, Aaron-7, Megan- almost 5 and Jonathan-9
They can be pretty goofy and silly but they have a lot of fun and I am blessed to be their mother. 

 So lets send the kids outside to play in the tree fort if it is warm or they can play inside if it is cool. Come to our living room and have a seat and lets get busy visiting!

  What would you like to visit about? It is my goal in my visiting (whether face to face or on this blog) to say things that encourage and build up others and glorify my heavenly Father. I know that unfortunately I don't always succeed but that is my goal.

   I have many, many interests (I think the woman in Proverbs 31 did too!) so I am pretty sure we have at least something in common. Maybe you would like to talk about....

  • Homeschooling. I would love to hear how you do it and what books you love. I enjoy talking about the ways we learn creatively, making the world our classroom. We love reading around here and I would be glad to show you some of the ones we have really enjoyed and learned from. It is always fun to get together with another homeschooler and pick each other's brains.
  • Gardening. I would love to give you a tour but it is still to early to plant here. In fact there is still quite a bit of snow on the garden. I did just get my seeds in the mail though and I will be starting stuff inside right away. I like to garden very frugally and naturally. I love to be able to get a lot of produce from it with which I can feed my family. We do also enjoy having quite a few flowers around our place and we keep adding more fruit trees and bushes about every year in hopes of someday having a lot of our own fruits. I am also studying up on and dreaming of keeping bees which will provide both honey, wax and pollination for our garden.
  • Living frugally. I very much enjoy getting to visit with other mothers and sharing tips on ways to live better on less. To me living frugally is not a chore but rather a really fun challenge! I love learning ways to spend less on food though the prices go up- and this while we eat healthier. I also love to challenge myself to make most of our gifts, save on electricity, go as long as possible without buying clothes or just go without shopping in general. So many ideas! I love to hear yours and I try to share mine so that we can all be better stewards of what God has given us.
  • Making things. In fact, if you want, I could pull out my stamps and stuff and we could have fun making cards together.  I love to keep my hands busy and I also really enjoy looking around our home and seeing things that we have made ourselves. To me it makes a home so much more personal to have much of the furnishings handmade.I have many interests in making things- sewing, knitting, crocheting, floral work, basket making, quilting, painting and more... 
  • Baking and cooking. If you ask me if I love to cook, "Yes" wouldn't be my first response. I have however learned to enjoy it by making it fun for me. I do a lot of cooking as we eat at home most of the time and I like to have homemade meals. What makes it fun for me is in the process of creating meals that are healthy for my family and help us to keep our food costs low. I also make things interesting in the kitchen by making up my own recipes, figuring out ways to use what we have an abundance of and by using our meals to further our education. I enjoy combining what we are learning in school with our foods. (Such as having ethnic foods to go along with our geography.)
  • Raising children, being a good wife,natural health, organizing, taking care of the earth God has given us and not being wasteful or maybe we could even have a Bible study. There is so much to talk about you might just have to come back again!
Can you stay for lunch? Lunches around here aren't very fancy, when it is just us we usually eat leftovers but today I think we will have soup. Would you like potato, tomato or split pea? The potatoes we gleaned from nearby fields and the tomatoes I grew in our garden.  I think we will have some homemade bread too, would you like to slice it? And we have some ginger cookies for dessert. I hope you like them!


So, what would you like to visit about? I would love to have you introduce yourself and tell what your favorite topic is in the comments! I look forward to meeting you all! Thanks so much for visiting!

A Onesie Dress

 I have seen onesie dresses mentioned off and on online and I thought it look like fun to try. I had a onesie and a knit shirt that had nice fabric that I decided to upcycle so I was ready to give it a try.

To make it I simply cut out a strip of cloth (actually it was two strips- I had side seams) for the skirt. I sewed it into a loop and then I hemmed one side and gathered the other. Then I flipped the skirt inside out and upside down over top of the onesie and pin the gathered edge on at the waist area. Then I sewed it I think using a zig zag stitch so that it would stretch better. You could stop at this point but I decided to put something around the neck too.

I cut a narrow strip of the floral cloth and then I finished one edge by sewing over it with zig zag that was set on a really short stitch. (Similar to what you would use for applique.) I let the knit fabric stretch a little as I sewed so that it would make it a bit ruffly. Then I gathered it up along the neckline and sewed it on again with zig zag. (I also finished the edges at the end of the strip.) Then I sewed a narrow ribbon over the area where I sewed the ruffle on.

That's it! It was easy and fun. I love upcycling like that. :-)
Have you ever made a onesie dress?


A sweet baby hoodie for a sweet little baby


 I have really been loving the new babies around here and I have found that I am quite addicted to making little sweaters. They are fun and pretty fast and they look so cute! This one I made for Baby Sunita Grace who we had a shower for on Saturday. 
Here is the link to the basic pattern. I didn't follow it all the way (I know I always say that- I guess I have trouble following directions!) but used yarn that I had on hand and I made the front striped and then I mixed up other color placements too. I also decided to add little pockets to the front and a little tassel to the hood.

I was having fun using up this rose colored yarn. The tassel was added partly because I had about 1 foot of it left and it seemed a shame to let it go to waste. :-) I bought the Rose yarn way back when I was in college and I made a sweater for my mom with it at that time (though I didn't follow gage right and it was way to wide- last year I finally fixed it for her!).

Next project with the Rose colored yarn was a baby sweater for Mara when she was little. She didn't wear it much however as I put some wool yarn next to her neck and I decided it might be to itchy. I finally got it fixed up when Megan was little and she wore it quite a bit. (This post has a picture of Megan in that sweater.)

Then last year I made a sweater for Megan out of it. You can see the post about it here.

Last month I made another sweater set for another baby and I trimmed it with the rose colored yarn.

This was the last one to be made from that yarn and it was rather fun to reminisce about what all I had used it for. And now I am curious? Do keep yarn on hand at your home? Have you had some stashed for quite while? What has been a favorite project you have made with yarn?


Barbie Furniture from Tuna Cans

 Not long ago a friend brought over this set of Barbie furniture that she made from tuna cans and gave it to my girls. I think it is pretty cute and thought I would share the idea with you all in case any of you know a girl that needs new barbie furniture.
 She simply opened the tune can but didn't take the lid completely off. Then she covered everything with fabric using glue. Inside the can she put stuffing and then glued a piece of cloth that she had tucked in over top. To make the footstool you do take the tuna lid off.

Megan and Mara's barbies are happy with their new chairs.


I am linking this up to Jackie's Fix it up Friday. You should go check out her cute burlap covered box and then link up your own "Fix it up" project.

A Baby Cardigan and Booties {That went together really fast!}

Last week I got to host a baby shower for a sweet baby girl (who was born last month on my birthday!). I thought it would be fun to crochet a sweater. I found this pattern online and I decided to give it a try.
 I didn't really understand the pattern very well when I first started but I decided to just follow it the best I could and see what happened. Pretty soon it started taking shape and it was very easy! I did end up changing it up a bit by adding scalloped edging. Then I made up my own pattern and made the booties.

I had a lot of fun working on this project especially since it went so fast! I am having fun working with yarn on these cold winter days. I also enjoy doing it when we travel which we have been doing some of lately.


Aaron had fun holding the recipient of the sweater.

I am linking this to Tea Rose Home
and to Tute {Yourself} Tuesday at Little Eme

Have a Handmade Christmas {Week 8}

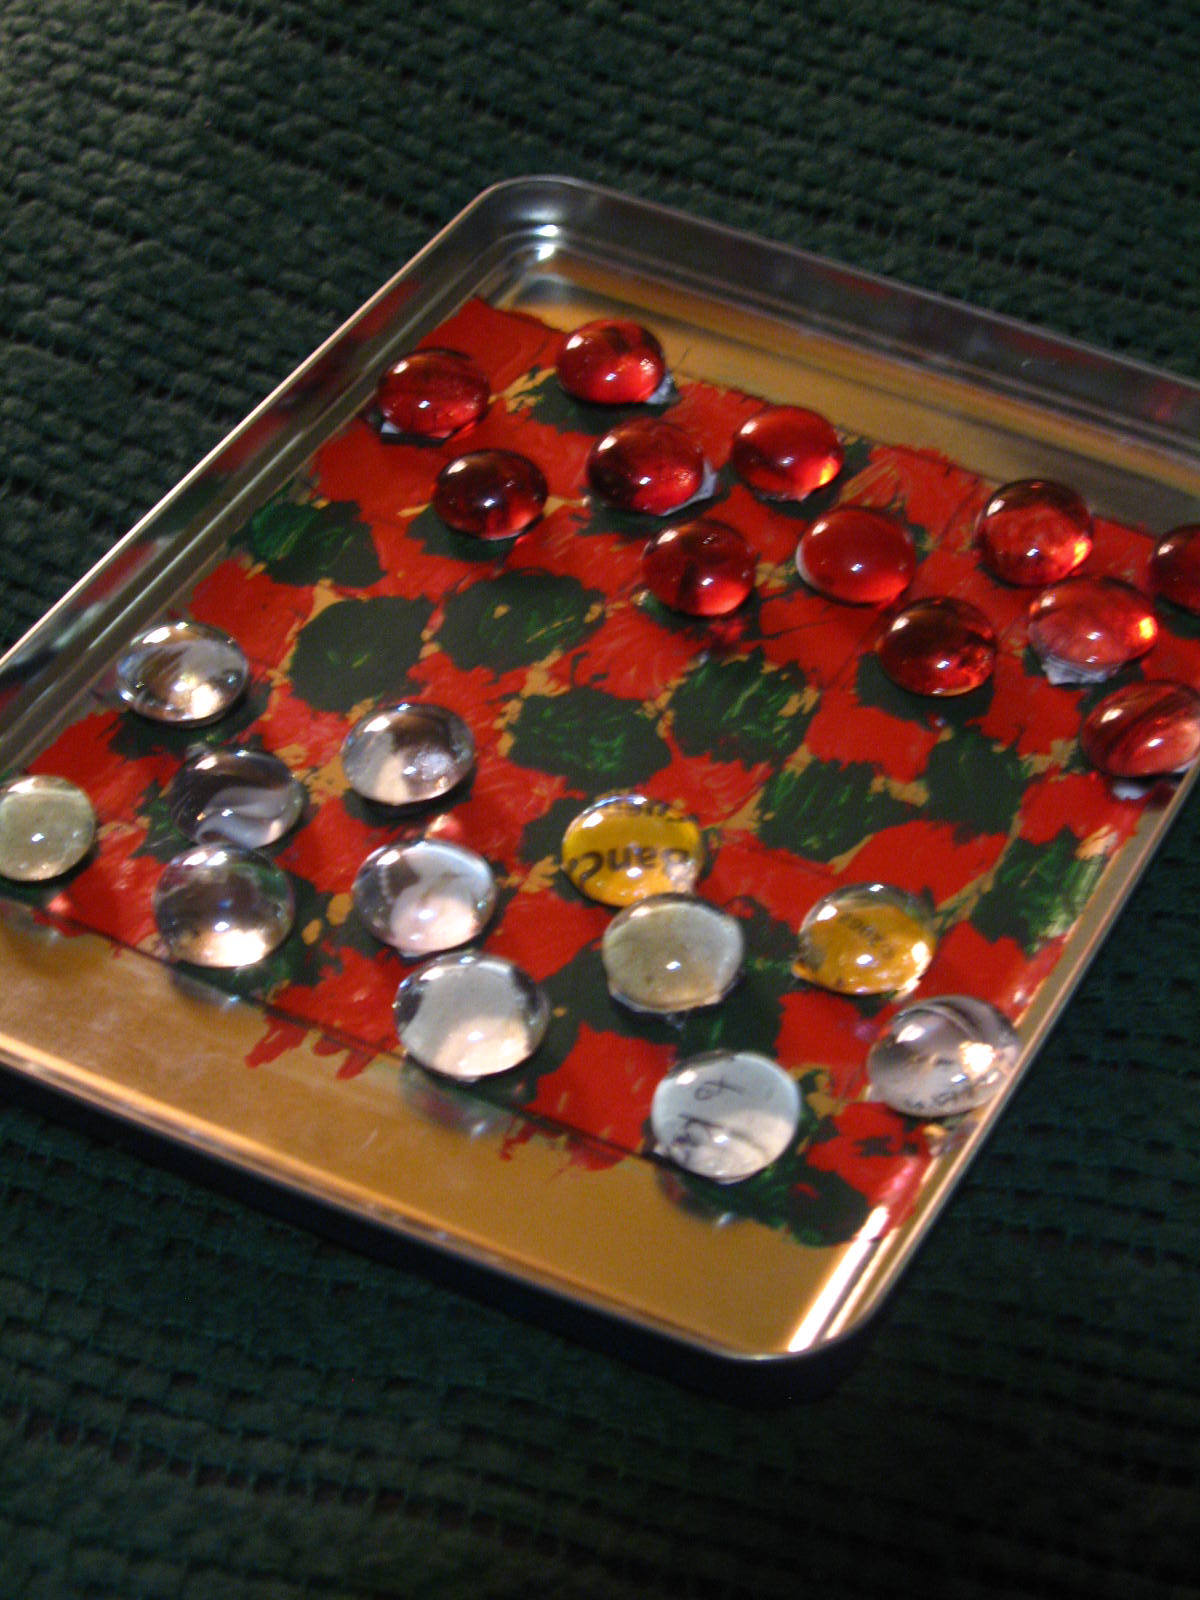
 This week I thought I would show you one of the presents that Aaron has made. It is a travel game set in a tin. You can use it to play Checkers, Tic Tac Toe and 5 in a Row.

To make it you need:
  • A tin that has tops and bottoms that are big enough to play a game on.
  • Flat Glass "marbles" in two colors.
  • Magnets (we used the type that we were given with advertisements on them- we cut them up)
  • Paint
  • Hot glue
To make the set Aaron cut out magnets to fit on the back of each of the "marbles" (he did 12 of each color) and glued them on. 
Then I marked the grid for Checkers and he painted the squares red and then after that dried he painted the other ones green. This was done on the inside of the lid. We had thought about painting the top of the lid but it had a cute Christmas picture and we decided to leave it alone.

 On the inside of the tin he put dots. (At first he painted dots but they weren't in very good rows and so he painted over that and then he (with some assistance at getting them in rows) used permanent marker to make more dots. To play this each person takes turns putting down their color of piece- wherever they desire on the board- trying to get 5 in a row and also trying to keep the other person blocked.
  On the bottom of the tin he painted a tic tac toe board.

 This project took a few days simply because of paint needing to dry but it is a pretty simple project. Jonathan loves to play games so this is a gift for him.

 Do you have any other ideas for games that would work with this?

What have you been making for Christmas lately?
Please link up your projects. Please link to you specific project post and please link back to here. Thank you!!


Have a Handmade Christmas {Week 7}

 With Christmas lights now sparkling in the snow outside it is beginning to feel very holidayish. Inside we are still decorated for fall (I like to stay that way at least until December and often until after my birthday on the 6th) but we are working a little more often on presents, there are some secrets around the house and we are having fun!

  We don't give large numbers of presents and everything has to be fairly small because our rule is "Everything has to fit in the stocking!". We still have the fun of presents without much stress. I am thankful we have decided to do it this way.

 We had quite a few projects started but not much finished so I hurried and got this one done this evening so I could share it with you.

 It is a journal for Mara. She has a nice normal journal (which she enjoys using) but I had read an idea once about a journal which you use to encourage one another. My plan is to write in the front page some encouraging words for Mara and then if she wants she can leave a message for someone else and stick on their pillow or someplace that they will see it. Or maybe it will be used simply for Mara with Ken and I leaving new notes every so often. I will see how it goes. I do think she will like it as she loves getting and giving little notes to say "I love you" or something else like that.
To make it I took around 20 sheets of paper and cut them in half. Then I took stacks of 5 and folded them in half.
Next I sewed a 3/8 inch seam down the side of each folded paper set, to hold the papers together. I think it is rather fun to sew on paper! :-)

 Next I cut out front and back covers. I just used brown cardboard. I cut them 5 3/4 inches by 4 1/2 inches- a little bigger than the paper.

Then I measured and marked 3 places for holes across the spine area of the papers and covers.
 Then I used a hammer and nail to make holes there so that I could put a needle through.
Then using some sturdy thread I sewed through those holes and tied them tightly together. I decided to leave the covers brown cardboard but they could also easily be covered with fabric or a decorative paper.
 Next I made a spine cover out of fabric. I cut the fabric 6 1/2 inches by 4 1/2 inches. I put a tiny hem in the top and bottom and then I folded the sides in to meet at the middle and hot glued them in place.

 I then glued it on putting a strip of fabric over the back and a little bit on each side of the cover.
 Next I decided to put fabric on the corners. I took a little strip which I hemmed on one side and glued on the outside of the cover.
 Then on the inside I folded over the raw edges and glued and then I folded them into the cover of the book and glued in place.
 This is what it looks like at this point. It could be done now but I decided to add a couple of touches.
I added a ribbon place marker which I glued one end of it in the spine and then put a couple of beads on the other end. I also decided to add some fabric flowers which I made from scraps using this idea. You could decorate your journal however you like best!

I also wanted to show you one of the gifts Megan (my 4 year old) has made.
She wanted to make cards with me the other day and I suggested she make some for Mara for Christmas.
She decided she wanted to use some veggie pictures that I had and then wanted to decorate them like Veggie Tales.  I pulled out the googly eyes and pom poms and she had fun. I love the result. She also wrote a card for her with parts of the Veggie Tales song and other things she wanted to tell Mara. We had a lot of fun working on this little project together.

What have you been making lately? Please join me and link up your handmade Christmas posts!

I would just request that you link up your specific post not just your blog and that you would link back to here. Thanks much! I looking forward to seeing your ideas!


Have a Handmade Christmas {Week 6}

 Hello! Welcome to this week's Have a Handmade Christmas! To be honest I am a little more in the mood for Thanksgiving right now as I am sure many of you are as well. We will see if their are many other posts linked up this week or not. :-)

 However we will press on with our creating of handmade gifts, decorations and other things to make our Christmas memorable and hopefully frugal too!

 This week I decided to make some note cards. I like to give them to friends. They are a simple but fun and practical gift and something I think is extra special about them is the fact that not only do they make the one you give them to happy but if that person uses them they will make a bunch more people happy too.

 I have written about note cards before but these are a bit different style and are easy to make while at the same time recycling old seed catalogs, magazines or calendars.

To make them you need:
  • Card stock
  • Pictures
  • Glue stick
  • Scissors
  • A damp rag
  • Pen or pencil
To start I cut the card stock in half and then folded each half in half to create a nice card. Then I found some pictures that I like that were big enough to cover the whole front of the card. I decided to do garden photos. The are from the Baker's Seed Company and they are very pretty high quality photos that I think a gardener will really love.
 Next I traced around the card on the picture (choosing the spot I wanted to have on my card- to be where I traced).
 Next I cut out where I had traced.
 Now I put a smooth layer of glue all over the front of the card.
Then I carefully put the picture on to the gluey card front and pressed it flat. Then there are usually little edges that hang over so I trim them off. If you get a bit of glue on the card or your hands- just use your damp rag to wipe it off.
 They are ready to dry! I did some cards with the pictures vertical and some horizontal. It works fine either way. I made a couple of sets of these garden cards- above is just one of the sets.

 Then I like to make envelopes from some of the really big pictures. You don't have to make envelopes, you can buy them, but we like the cheery colors of homemade ones (and the people that receive our letters say that they like them too) and we also like the fact that we are recycling when we make them.
 This is what the envelopes look like after being folded up. After that we put on a blank address label so that the address can be written on white rather than on the very colorful envelope. You can just tape the envelopes shut to seal.
I also made some floral cards in a little different way. These pictures were smaller so I cut them out, mounted them on a colored piece of paper that coordinated with the flower and then using double sided tape I put that on the front of the card. It is very quick and easy but yet colorful and pretty! 
 Here are two finished sets each with 6 cards and envelopes (the garden produce set has homemade envelopes and the floral set has plain Jane purchased envelopes). I have plans for giving away some of my garden sets to some friends but one of these sets is for one of you! The winner will get to chose the set they want.

To Enter the giveaway (read carefully because I am going to make it a little different)

  • 1st entry (do this one first or any others will not count) Head over to my post on Thanksgiving and tell me something about your thanksgiving (either this year or a past year) and then come back to this post and tell me that you did and which card set you want if you win.
  • additional entries: Link up a Handmade Christmas post to this post and then leave a comment saying you want to be in the giveaway drawing. Become a follower of my blog (using google connect, e-mail subscription or an RSS feed)-Current followers count too. Then leave another comment saying you did that.
This giveaway is open to anybody. It will be open until December 4th. Please be sure to leave your e-mail so I can contact you if you win!

This post is linked to Frugal Fridays- $10 gifts (and under) edition.


Now it is your turn to share what handmade things you have been working on!

Please remember to link to your specific post and to link back to here so that more people will hear about it and join in. Thanks!