 Hello! How are you all doing? Is your home looking all ready for Christmas now? Mine isn't all there yet but it is coming along.
This week I thought I would share a tutorial for a project that I have a lot of fun making. Also I really like having plenty of tote bags on hand. I like to use every minute that I have and I love having a tote bag to through my current project in, so that no matter where I am, my hands can be busy.
I am still learning how to do tutorials, so if you have any questions, please comment or e-mail me and I will try to answer them quickly.
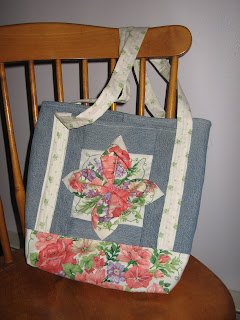 Here is the tote bag that you can make.
What you will need:
- A pair of heavy weight pants, adult size. (you actually need only one leg per bag)
- Around 1/2 yard of accent material.
- Thread
- scissors and a sewing machine.
Lets get started!
 Step 1: When using a pair of pants/jeans to make them you can cut a strip out of each leg at about 30 inches long and 10 inches wide. (If you aren't using a pair of pants you can just cut a piece of fabric at 30 inches by 20 inches and skip step 2.)
 Step 2: With right sides together sew the strips together with a 3/8 inch seam.
 Step 3: Out of your accent fabric cut a 12 inch square.
 Step 4: Fold it into an origami flower using these instructions.
 Step 5: Cut some pieces of denim (or you can use the same accent fabric) to go around the block. 2 pieces should be 3 X 6 inches and the other 2 should be 3 X 11 inches. Sew the short ones on first to two sides and then sew the long ones on the other sides. (use 1/2 inch seams).
 Step 6: open the flower petals and hand stitch them down. Also stitch a button in the middle.
Step 1: When using a pair of pants/jeans to make them you can cut a strip out of each leg at about 30 inches long and 10 inches wide. (If you aren't using a pair of pants you can just cut a piece of fabric at 30 inches by 20 inches and skip step 2.) Step 2: With right sides together sew the strips together with a 3/8 inch seam.Step 3: Out of your accent fabric cut a 12 inch square.Step 4: Fold it into an origami flower using these instructions.Step 5: Cut some pieces of denim (or you can use the same accent fabric) to go around the block. 2 pieces should be 3 X 6 inches and the other 2 should be 3 X 11 inches. Sew the short ones on first to two sides and then sew the long ones on the other sides. (use 1/2 inch seams).Step 6: open the flower petals and hand stitch them down. Also stitch a button in the middle.Step 7: Hem the one side which will be the top of the pocket.

Step 8: Cut 2 strips of accent fabric 42 X 3 inches. With wrong side up, fold one side in 1 inch. then fold the other side in 1/2 inch and then over again so that all raw edges are covered. Sew together. If you like you can using a fancy stitch and pretty thread to make the handles more interesting.
Step 9: Cut fabric for inside pocket just slightly larger than the outside pocket. Hem around all the edges.
Step 10: Lay outside pocket in the middle of the side of the denim about 2 1/2 inches down from the top. Pin the handle strip on either side as pictured.
 Step 11: Flip over to wrong side and pin the inside pocket in place directly behind outside pocket.
 Step 12: Sew down each side of the handle straps. Sew to about 1 inch above the pocket. At that section I do a criss cross pattern to make sure the handles are attached sturdily. While you are sewing the handles in place be sure that you are catching the pockets as well. Do not worry about sewing the bottom of the pockets yet.
Step 13: On the other side of the bag pin the handle strap the same way you did on the first side just minus the pockets. Sew in place.

Step 14: Cut a piece of fabric as long as your bag is wide and 11 inches wide. Place directly in the middle of what will be the bottom of your bag. Turn the raw edges under 1/2 inch or so. Pin in place and then sew.
Step 15: Fold bag in half with the right sides together. Pin and sew side seams.
 Step 16: At the bottom corner (on each side) fold it like pictured above so that a triangle is sticking out. Sew a seam down 2 inches. Do this on both sides.
 Step 17: Cut off the extra triangle being sure to leave a seam allowance.
 This is what the bag will look like on the inside.
Step 18: Sew a hem around the top of the bag.
All done!! Now you have a pretty little bag!
If you would like to try to win one of these instead of making it, go check out my giveaway that is going on through the 9th.
Have you been working on any homemade Christmas projects? I would love it if you would share! Either comment or leave your link on the Mr. Linky.
Have you been working on any homemade Christmas projects? I would love it if you would share! Either comment or leave your link on the Mr. Linky.