After you have sewn your leg pieces together, we will start the hem of the legs.

You will need two pieces of heavy weight interfacing or buckram. They should be 1"x16".

 Step 1
Center the buckram on the wrong side of the bottom of the leg opening, about half an inch up from the edge.
 Step 2
Fold the half inch of fabric up over the buckram, you can sew one line of stitches along the edge to hold it in place if you like.
 Step 3
Fold the buckram up one inch, so that is completely enclosed in the fabric, if you have not sewn a line of stitches to secure it then you may like to pin it in place now.
 Step 4
Sew anywhere from 2-10 lines of stitches running perpendicular to the bottom of the leg opening. The minimum is one line at the very top edge of the buckram and one at the bottom.
 A bit difficult to see but on this shalwar I sewed 6 lines.
 Step 7
Place the two leg pieces with right sides together and sew only one of the crotch seams, this is the center front.
 Here is what your first two pleats should look like.
Step 10
Continue making knife pleats(they should be overlapping by about 1/4 to 1/2 inch) that face the center seam until the distance between thecenter seam and the center of the rectangular center leg piece is about 5"-6", so the total width of the center pleated section should be 10"-12".
 This diagram basically shows what you are trying to do, the center of the leg pieces should fall from your hip bones in a line down the front of your legs, so the area between points A and C should be roughly the distance across your hips, somewhere in the neighborhood of 10"-12"(can be more if you need it but not less).
 This diagram basically shows what you are trying to do, the center of the leg pieces should fall from your hip bones in a line down the front of your legs, so the area between points A and C should be roughly the distance across your hips, somewhere in the neighborhood of 10"-12"(can be more if you need it but not less).
 Step 11
Sew a line of stitches to secure all the pleats in place, it should be between 1/4 to 1/2 inch down from the top edge.
 On this shalwar I have made nine pleats on either side of the center seam, total of 18 pleats across the front.
Step 12
Now to make the pleats on the back side of the shalwar-lay it out flat, and make knife pleats that face away from the center back seam.
 Step 13-
Pinch one inch of fabric, and then lay it flat, facing away from the center back seam, pin in place.
 Step 14-
Make several pleats, until the distance from the center front seam to the center back is half the width of your belt. Do the same on the other side of the shalwar. On my shalwar I made 3 pleats on either side of the back seam for a total of 6 pleats.
 Step 15
Sew a line of stitches to secure the pleats, in the same way as you did for the front pleats in Step 11.

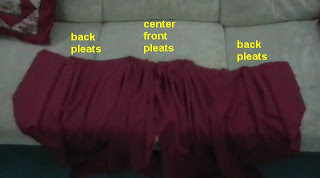
Here is what you should have so far, the two leg pieces sewn together with a large section of pleats in the center and two smaller sections at either side(this will be sewn to make the center back seam).
End of part two, if you have any questions please leave a comment and let me know.


