For your kameez, you will need a piece of cloth that is at least 32" by 96". If you like short sleeves then 32" by 96" should be enough. If you want longer sleeves there are different options- first you could join two pieces together to make the sleeve pieces the right size, or you could just get a larger piece of cloth.
The first step is to get the measurements needed for your suit. To make this easier you may want to measure a shirt you already own(it doesn't have to be a kameez any non-stretchy shirt will work), but it is not absolutely necessary. Measuring a shirt that you already have makes it a bit easier because then you don't have to figure out how much ease you need.

-Measurement one is your chest measurement. Measure across the widest part of your bust, I add about three inches of ease because I like my suits on the loose side.
-Measurement two is what I call the "under bust" measurement. It is roughly 2-3 inches below your bust or about 4-5 inches above your belly button. I also add three inches of ease to this measurement.
-Measurement three is your hips, measure at the widest part. I only add two inches of ease here.
-Measurement four is your sleeve length, measure from the top of your shoulder(where the seam of your shirt sits) to the length that you want and add 3 inches.
-Measurement five is around the widest part of your upper arm. Here also I add three inches ease.
-Measurement six is your wrist, if you want half sleeves measure around the area you want your sleeves to end. If you go for long sleeves, you may want to measure around the widest part of your forearm, to make sure your sleeves are loose enough that you can push them up if you need to.
-Measurement seven is the kameez length. While standing measure from where your shoulder seam is to where you want your kameez to end, then add three inches. I like a finished length of 38", and I am 5'2" tall. The kameez is exactly at the middle of my knee cap. Current fashion in Karachi is longer kameezes, but for my daily wear I try to stick to regular length/fit.
-Measurement eight is your shoulder measurement, just measure from one shoulder seam to the other, and add 2 inches.
Step two is to cut two rectangles-
 Fold your cloth in half length wise, with right sides together. Take you widest measurement(including ease, probably hips or chest), then add an additional two inches for seams. Measure across this amount, and then measure down your length plus three inches. Cut along these lines, and then fold the two rectangles in half length wise again so that on one side is a fold and the other is four edges.
 Step three starts on the upper left corner, measure out half of what you got in measurement eight. My shoulder measurement is 12, then I add two, to get 14 so I measure out from the fold 7 inches and mark. From this mark, measure straight down 8 inches and mark. Draw a line from the first mark to the second, and then straight across to the edge. Now measure out from the corner of the rectangle you just drew, and mark at 1 1/2". Now draw a curved line from the top mark, down through the diagonal mark, and end at the bottom right corner.
 Step four, from the fold side measure out and mark half of your chest measurement(including ease), and mark. Then measure down from that line 7 1/2"(if you have a larger chest, like a D cup or more you may want to add an inch or two), from there measure out the underbust measurement(including ease) and mark. Again measure down 7 1/2" and from there measure out by your hip measurement. It is important to make sure that there is one inch on the outside edge from the hip mark down to the bottom, if your hip was not you largest measurement you may have to trim this area. Now draw a line connecting the bust measurement to the underbust to the hip. Then draw another line parallel to that one, one inch out towards the edge.
 Here is a pic of my suit with chalk marks, before cutting.
 Step five starting at the top, cut along the curved line first, then cut along the outer line from bust to hip.
Step six -Now for the neck you will need a piece of light weight fusible interfacing. It needs to be at least 8 inches wide by 7 inches tall. Fold it in half, and draw the shape you want for your neck opening, keeping the piece one inch wide. If you like a larger neck opening then you can use a larger piece of interfacing, but the neck piece should always be 1 inch wide.

 Step seven- Take your interfacing and iron it to the wrong side of an extra piece of cloth that is half an inch larger on all sides except the top.
 Step eight- Fold the edges over and sew a line one quarter of an inch from the edge.
 Step nine-Take one of your shirt pieces, and place it right side up on a flat surface. take the interfacing that you just sewed and place it interfacing(wrong) side up. So the right sides are facing each other. It is very important that this part be exactly centered between the shoulders. You may want to pin it, so that it doesn't move while sewing otherwise your neck opening will be crooked.
 Step 10-Sew a line around the inside of the neck, just on the very edge of the interfacing. Cut out the middle section leaving a 1/4 inch seam allowance.
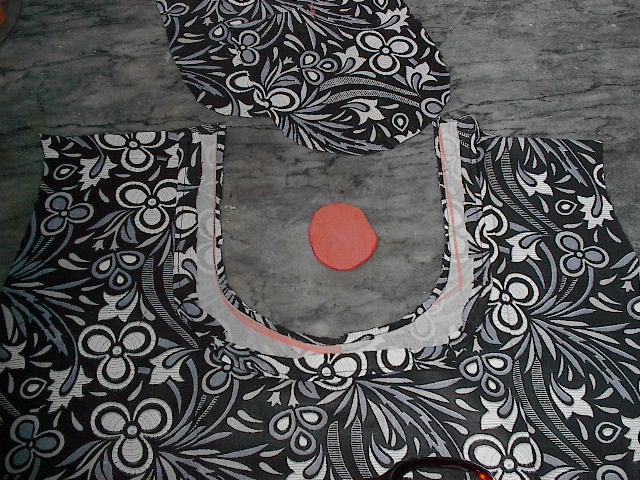 Step 11-turn the interfacing to the wrong side of the shirt, and then sew two lines, one on the very edge, and one half an inch out. This is the simplest way to do the neck, but a more authentic way is after folding the interfacing in, use the blind hem technique on the the very edge of the interfacing. I found a really good tutorial for this technique here.
 Step twelve-For the back neck opening, fold the shirt back in half with the right sides facing. Measure out from the fold 3 inches, and down 2 1/2". measure out diagonally from the corner 1 inch and mark. Now draw a curved linefrom the fold through the diagonal mark, and up to the top. Cut along this line.
 Step thirteen-Take a long strip of extra cloth that is 1 1/2 inches wide, and fold in halfw
Pin the strip to the raw edge of the neck opening with the fold facing away from the raw edge. Cut away the extra length of the stripe. Sew a 1/4 inch seam.
 Step fourteen-Fold the strip you just sewed to the inside(wrong) side of the shirt piece, and sew along the edge of the strip. Or you could use the blind hem technique.
This is the end of part one of the kameez tutorial. I hope to post part two soon.
If anyone spots any errors or you find any part a bit confusing comment to let me know.

